Fishbone Diagram by Kaoru Ishikawa explained

Fishbone diagram / Ishikawa diagram - Toolshero

Fishbone Diagram: this article explains the Fishbone Diagram or Ishikawa Diagram by Kaoru Ishikawa in a practical way. After reading you will understand the basics of this powerful problem solving tool and Cause and Effect Analysis. This article also contains a downloadable and editable Fishbone Diagram template. Enjoy reading!

What is a Fishbone Diagram / Ishikawa Diagram?

Many problems in organizations are the result of multiple causes simultaneously. Treating only the symptoms often causes the problem to disappear temporarily, but it will return later in a different form. Brainstorming helps to identify possible causes, but is usually not done in a structured way. The Ishikawa diagram was developed precisely for this purpose.

Kaoru Ishikawa, a Japanese quality expert who worked for Kawasaki Heavy Industries, among others, designed a simple but powerful graphical tool to systematically identify the causes of problems. Instead of a loose list of ideas, all possible causes are organized around one clearly formulated effect or problem. This creates a clear structure that makes the discussion about real causes much more focused.

The Fishbonemodel is known by various names. Because the drawing looks like a fish bone with a head, spine, and side branches, it is often called a fishbone diagram. In the world of quality, it is also referred to as a cause and effect analysis or cause and effect diagram. In all cases, the principle is the same: systematically mapping out the possible causes of a problem as a starting point for a root cause analysis.

Originally, the Fishbone diagram was mainly used in production environments and quality control. Think of deviations in product quality, machine malfunctions, or errors in a process. Nowadays, the model is also widely used in other sectors, such as services, healthcare, logistics, and the public sector. Wherever a team wants to understand why a problem keeps recurring, the fishbone diagram can help to reveal patterns and causes.

The Fishbone diagram is often combined with other improvement tools, such as five whys, Pareto analysis and PDCA. In many Lean and Six Sigma training courses, it is considered one of the basic tools for quality improvement. Its strength lies in its simplicity: one problem, a visual diagram, and a structured discussion about causes, rather than quick assumptions or random opinions.

How do you create an Fishbone diagram?

To make an Fishbone diagram clear and useful, possible causes are usually grouped into fixed categories. In production environments, the 6M is often used. This classification helps teams to take a broad view and not miss any important angles.

Fishbone Diagram example - toolshero

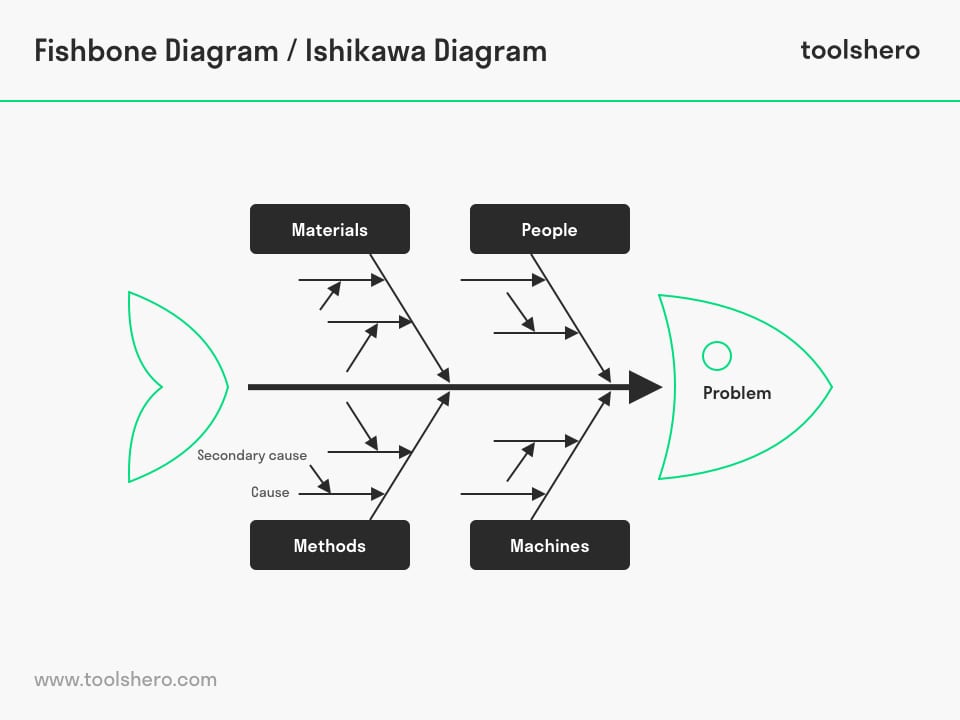
Figure 1 – an example of a Fishbone Diagram

People

The People category covers everything that people do and don’t do. This includes causes such as poor communication, unclear instructions, low engagement, high work pressure, or insufficient experience and training. Induction, coaching, and collaboration also play a role. The key question in this branch is whether employees understand what is expected of them, whether they are well equipped for their tasks, and whether the preconditions are right for them to do their work properly.

Machine

Machine focuses on resources such as machines, tools, installations, and computers. Possible causes include malfunctions, overdue maintenance, incorrect settings, outdated equipment, or unsafe situations. Here, we examine whether the right equipment is being used, whether it is safe and reliable, and whether it meets the technical requirements of the process.

For a technical company, it might be appropriate to expand the “machine” category with an ‘IT’ category. An advertising agency could possibly include the expansion “creativity.” As long as the causes of problems are identified, the purpose of the Ishikawa diagram has been achieved.

Material

Materials refer to raw materials, auxiliary materials, parts, and semi-finished products. Problems can arise due to varying quality, incorrect specifications, contamination, incorrect storage, or too large or too small a quantity. Lifespan and resistance to external influences also play a role. The most important questions are what the quality of the material is, how much is needed, and whether the material is suitable for the conditions in which it is used.

Method

The Method category concerns the way of working. This includes processes, procedures, work instructions, work sequence, and cooperation agreements. Causes can lie in unclear or outdated work processes, insufficiently documented agreements, or major differences in working methods between teams or departments. This branch examines whether the chosen method is logical, clearly described, and actually followed in practice.

Measurement

Measurement concerns how measurements are taken, checked, and recorded. Possible causes include unsuitable measurement methods, inaccurate measuring equipment, poorly calibrated equipment, or unclear interpretation of data. Sometimes measurements are not taken at all or are taken too late. The key question is whether the right things are being measured, whether the measurements are reliable, and whether the results are used to make timely adjustments.

Environment

Environment refers to the conditions in which the process takes place. Think of temperature, humidity, light, sound, vibrations, available space, ergonomics, and safety. Sometimes building-related factors or regulations also play a role. Here, we examine which environmental factors influence the process and whether those conditions are optimally designed for people, machines, and materials.

In service and office environments, these categories are often adapted. People and Method are almost always retained. Machine is then broadened to Resources or ICT, and Material to Information or Documents, for example. The principle remains the same. By collecting causes per category, structure is created in the discussion and it quickly becomes clear which parts of the process deserve extra attention in the further analysis.

How to use the Fishbone diagram in a team

The Fishbone diagram works best when completed together with a team. Below is a practical step-by-step plan that can be applied directly in a session.

Step 1. Choose and formulate the problem

Start with one specific problem. Write it down clearly and measurably, for example: “Too many complaints about delivery times in the past three months.” This problem statement goes at the head of the fish. Make sure everyone in the group agrees with it.

Step 2. Choose the categories

Determine which categories are relevant to the subject. In production, these are often People, Machine, Material, Method, Measurement, and Environment. In a service environment, these could be People, Method, Resources, Information, Customer, and Organization. Write these categories as main branches on the spine of the fish.

Step 3. Brainstorm causes per category

Let the team name possible causes for each category. This can be done quickly and freely, without immediate judgment. Write each cause as a short, concrete sentence on a side branch. Work systematically through each category so that the entire process is covered and not just the most visible causes are mentioned.

Step 4. Make causes more concrete and group them

Once the first round is complete, go through the diagram together. Bundle duplicate or strongly overlapping causes. Make vague formulations more concrete, for example, change “poor communication” to “no fixed transfer between departments A and B.” This makes the diagram readable and usable for the next step.

Step 5. Explore the most important causes in more depth

For each category, select a few causes that the team believes contribute most to the problem. Then explore these causes in more depth, for example using the five whys technique. For each cause, ask again why this is the case. Add the underlying causes as additional branches to the Fishbone diagram. This shifts the focus from symptoms to real root causes.

Step 6. Select causes for follow-up actions

Conclude the session by choosing the causes that the organization will tackle first. Consider two questions. How significant is the effect of this cause on the problem? To what extent can this cause be influenced? The causes that have both a significant impact and are influenceable become priorities. These form the basis for improvement actions, which can then be elaborated in an action plan or a PDCA cycle.

In this way, the Fishbone diagram becomes more than just a nice drawing. It becomes a structured conversation that helps to move from complaints and symptoms to underlying causes and concrete improvement steps.

Fishbone diagram example: from complaint to cause

The Fishbone diagram only becomes truly clear when it is linked to a recognizable situation. The example below shows how a manufacturing company used the fishbone diagram to solve a recurring quality problem.

A manufacturing company was receiving an increasing number of complaints about products that did not meet specifications. Customers reported size differences and minor damage. Initially, the team’s reflex was to carry out additional checks and stricter final inspections. This resulted in more work and higher costs, but the problem kept recurring.

The company decided to organize a session with a multidisciplinary team. The problem was formulated specifically as: an increase in the number of rejected products in the past three months. This sentence was placed at the top of the Fishbone diagram. Next, the well-known 6M categories were used: Man, Machine, Material, Method, Measurement, and Environment.

Possible causes were brainstormed for each category. Under People, topics such as new employees on the line, limited training, and unclear handover between shifts were raised. Under Machine, minor malfunctions, wear and tear of parts, and changing settings after maintenance were discussed. Under Material, it emerged that there had recently been a change of supplier and that the quality of the semi-finished product supplied was sometimes variable.

Under Method, issues such as the lack of clear work instructions and differences in working methods between shifts were mentioned. Measurement revealed that spot checks were consistently carried out at the start of the shift, but were regularly skipped at the end of the shift due to time pressure. Environment yielded fewer causes, except for a comment about poor lighting on part of the line, which made minor deviations less likely to be noticed.

After completing the Fishbone diagram, the causes were refined and grouped. The team then selected a number of causes to investigate further. Using the five whys method, it became clear, for example, that new employees did receive a brief instruction, but no practical guidance during their first few days. It also emerged that the new supplier of semi-finished products had no clear agreements on tolerances and quality reports.

The outcome of the session was a set of concrete actions. The company improved the induction program for new employees, including guidance on the line. The work instructions were made visual and implemented uniformly throughout the company. Firm agreements were made with the supplier about specifications and quality controls. In addition, the sampling plan was adjusted so that measurements were also mandatory and feasible at the end of the shift.

After a few weeks, the rejection rate was reviewed again. The number of rejected products had clearly decreased and customer complaints had declined. More importantly, the team had learned together not only to respond to symptoms, but to systematically look at causes. The Ishikawa diagram served as a common language and structure for this.

This kind of practical experience demonstrates the power of the fishbone diagram. It helps teams to dissect a complex problem, combine different perspectives, and work together to move from sensing that something is wrong to knowing which causes deserve the most attention.

Fishbone Diagram template

An Fishbone diagram template makes it easy to tackle a problem in a structured way. One clear problem is identified and possible causes are neatly categorized. This immediately creates calm and structure instead of a loose collection of ideas. With this template, a team can collect, organize, and explore causes step by step, so that not only the symptoms are addressed, but the real causes are identified and can be converted into targeted improvement actions.

Download

Download the Fishbone Diagram template

For members only | Get instant access to the Fishbone Diagram template — plus unlimited access to 1,200+ expert articles and tools. Explore Membership Options

Limitations and pitfalls of the fishbone diagram

The fishbone diagram is a powerful tool, but it is not a miracle cure. Especially when it is used frequently, it is important to be aware of its limitations and pitfalls.

A first pitfall is that the diagram can become too full. In an enthusiastic session, sometimes all ideas are written down, resulting in a fish with dozens of side branches and sub-branches. At that point, the overview disappears. It helps to consciously delete, merge, and choose which causes are really important for the follow-up after the initial brainstorming session.

A second limitation is that the Ishikawa diagram is a qualitative tool. It shows which causes may play a role, but says nothing about the strength of those causes. Without data or additional analysis, it is not clear which causes contribute most to the problem. That is why the diagram works best in combination with data, measurements, and, for example, a Pareto analysis.

A third pitfall is groupthink. In group sessions, dominant voices sometimes prevail, causing certain causes to receive a lot of attention and others to be barely mentioned. It is therefore wise to first have people briefly note down causes individually and only then share them, or to consciously invite people who look at the process from a different perspective.

A fourth risk is a poorly formulated problem. If the problem at the head of the fish is too vague, for example, “the quality is not good,” it becomes difficult to identify specific causes. The more concrete the problem is in terms of time, place, and effect, the sharper the analysis will be. Good preparation on this point always pays off during the session.

Finally, symptoms may be written down as causes. An example is “many rush orders” as the cause of errors, when in fact this is more likely to be the result of something else, such as poor planning or unreliable delivery times from suppliers. By consciously asking during the session whether something is a cause or a consequence, the focus remains on the real root causes.

The key point is that the Ishikawa diagram is primarily intended as a structured thinking framework. It helps teams to investigate together what might be going on. The real value only emerges when the results are tested against facts, explored in greater depth, and translated into concrete improvement actions.

Tip: Combine the Fishbone Diagram with other powerful methods such as Problem Tree Analysis, the CATWOE Analysis or the Root Cause Analysis. These techniques help you understand root causes, stakeholder perspectives and systematic relationships. Discover how these models reinforce each other in your analysis process!

Join the Toolshero community

More information

Recommended books and articles about the Ishikawa diagram

  1. Andersen, B., & Fagerhaug, T. (2006). Root cause analysis: Simplifying root cause analysis and corrective action processes. QW Press, 18(3), 113–128. → Describes how fishbone diagrams are part of in-depth cause-and-effect analysis and how they reinforce thinking about causes.
  2. Besterfield, D. H. (2013). Quality Control (Global Edition). Harlow, UK: Pearson. → Discusses quality tools such as the Ishikawa diagram within a broader quality management framework and explains how they work together to drive performance improvement.
  3. Evans, J. R., & Lindsay, W. M. (2014). An empirical analysis of quality management tools in manufacturing. International Journal of Quality & Reliability Management, 31(5), 1–20. → Investigates which quality tools actually have an impact and demonstrates that Ishikawa diagrams provide strong support in problem identification.
  4. Ishikawa, K. (1990). Introduction to Quality Control. New York, NY: Productivity Press. → Explores quality analysis tools, including the fishbone diagram, and offers practical applications within business processes.
  5. Ishikawa, K. (1985). What Is Total Quality Control? The Japanese Way. Englewood Cliffs, NJ: Prentice-Hall. → Classic source in which Kaoru Ishikawa explains his fishbone vision and shows how quality analysis is carried out systematically.
  6. Rooney, J. J., & Van den Heuvel, L. N. (2004). A comparison of tools for root cause analysis. Quality Management Journal, 11(2), 65–72. → Compares various root cause techniques, including the Ishikawa diagram, and shows in which situations the diagram is most effective.
  7. Morgenstern, R. D. (1997). Back to basics: Benchmarking and the fishbone diagram. Quality Progress, 30(7), 39–43. → Places the diagram in a practical context and shows how to use it effectively in benchmarking and quality improvement.
  8. Pande, P. S., Neuman, R. P., & Cavanagh, R. R. (2000). The Six Sigma Way: How GE, Motorola, and Other Top Companies Are Honing Their Performance. New York, NY: McGraw-Hill. → Although primarily a Six Sigma resource, this work discusses how fishbone diagrams are used in performance and process improvement programs.

How to cite this article:
Mulder, P. (2013). Fishbone Diagram (Ishikawa). Retrieved [insert date] from Toolshero: https://www.toolshero.com/problem-solving/fishbone-diagram-ishikawa/

Original publication date: 07/19/2013 | Last update: 12/14/2025

Add a link to this page on your website:
<a href=”https://www.toolshero.com/problem-solving/fishbone-diagram-ishikawa/”>Toolshero: Fishbone Diagram (Ishikawa)</a>

Did you find this article interesting?

Your rating is more than welcome or share this article via Social media!

Average rating 4 / 5. Vote count: 8

No votes so far! Be the first to rate this post.

We are sorry that this post was not useful for you!

Let us improve this post!

Tell us how we can improve this post?

Patty Mulder
Article by:

Patty Mulder

Patty Mulder is an Dutch expert on Management Skills, Personal Effectiveness and Business Communication. She is also a Content writer, Business Coach and Company Trainer and lives in the Netherlands (Europe).
Note: all her articles are written in Dutch and we translated her articles to English!

Tagged:

Leave a Reply